There are times when you need a shared Internet connection. For instance, if your data plan is over or the net connection goes down, you must borrow Internet from someone (sometimes from your nasty cousin). Or suppose you’ve got some works to do in your computer, but there are no ways you can access the network from it. And moreover, if you want to steal your cousin’s Internet plan, nothing can help you better than the Wi Fi Hotspot. In this tutorial, I’m going to show you how to create a Wi-Fi zone with your android mobile without installing any third party app! It’s really an easy process and you don’t need any ninja-craft to turn your favorite android smartphone into a super-duper Wi-Fi hotspot instantly. So grab your seatbelt, you’re about to evolve into a walking Wi Fi zone.
Note: Users from US may face some difficulties in this procedure, as they might need a working tethering plan. So make sure you have a tethering plan running. Or else search for other Wi-Fi tethering apps in the Playstore which will help you skip the plan requirement.
So How To Do It?
The process will merely take 2-3 minutes. Follow the simple steps below.
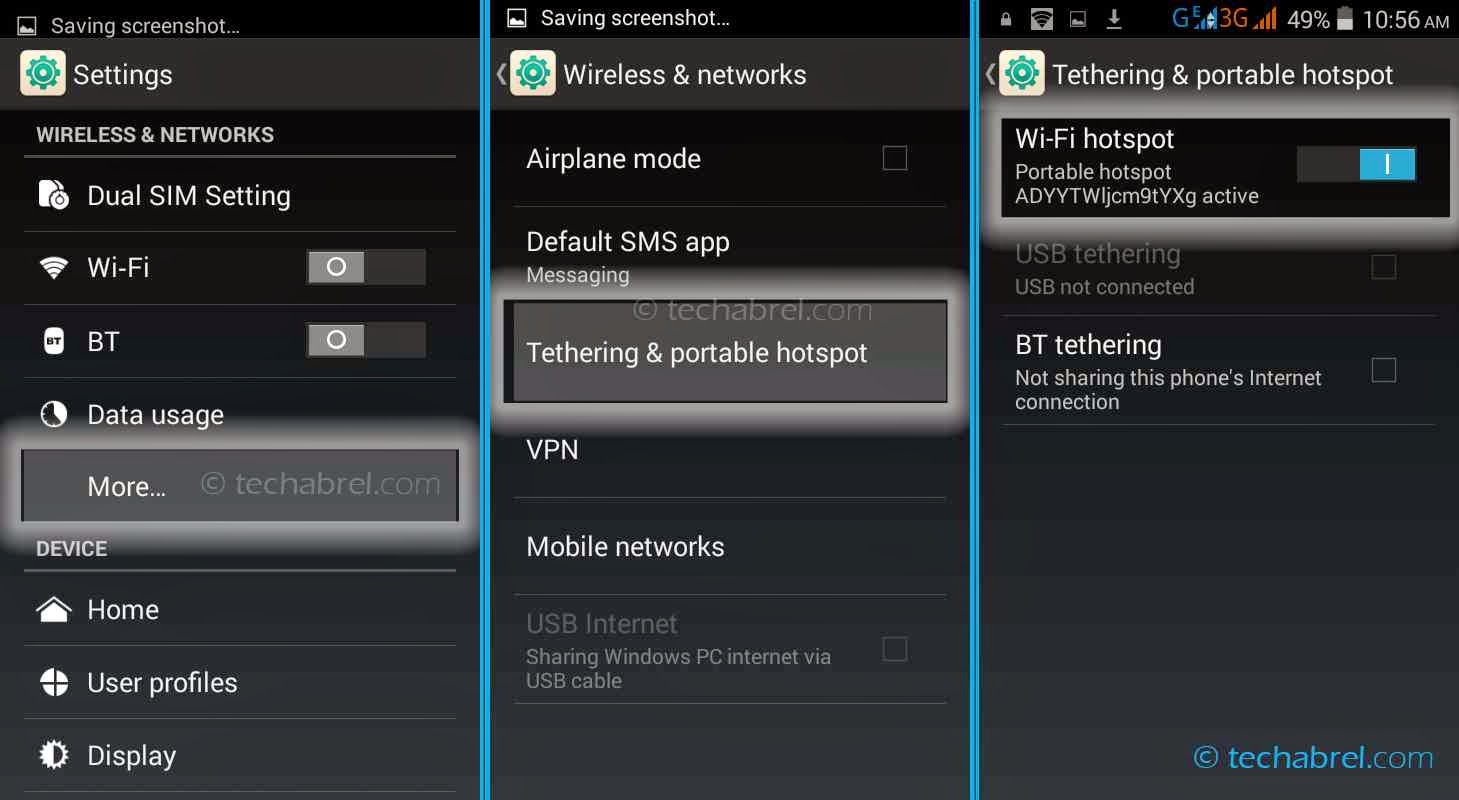
1. First of all go to Settings.
2. Now in the Wireless and Networking section click on More.
3. Next navigate to the option Tethering and portable hotspot.
4. There simply switch on the Wi-Fi hotspot (by sliding the switch).
That’s it. Now you can easily connect your computer or any other device to Internet. To do that just switch on the Wi-Fi on that device. Then it will automatically show down the list of Wi-Fi networks available (including your newly created Wi-Fi hotspot). Just connect to that and you're done.
Customizing The Wi-Fi Name:
If you want to give your Wi-Fi a custom name, at first tap on the Wi-Fi hotspot option (in the Tethering & portable hotspot section). Now press Set up Wi-Fi hotspot. And change the Network SSID to any name you want.
Setting Up A Password:
To set a password to your Wi-Fi hotspot follow the same path as you did while naming your Wi-Fi (i.e. Go to Tethering & portable hotspot > Wi-Fi hotspot > Set up Wi-Fi hotspot). Now below the Network SSID, you should notice a Security option. Found it? Great. By default it remains set to Open. Change it to WPA2 PSK. And soon after you do that, a password field should arise. Erase whatever’s written up there and type down any desired password you want.
Other Settings:
Under the Basic Settings section in Wi-Fi Hotspot, there’s an option named Keep Wi-Fi hotspot on. With this option, you can easily set a time after which the hotspot will shut down. The Bandwidth usage shows how much network is being exploited by the connected device. And you can also limit the data transfer speed by enabling the bandwidth throttling.
Conclusion:
So thus we can use our android smartphone to create a Wi-Fi zone anyplace, anywhere. Go and try it out yourselves. In case you face any difficulties following the steps, just mention it in the comments section. I'll get back to you. And if you found the article helpful, please share it to your buddies (before they do)
Best Regard: Dayur Digt


No comments:
Post a Comment
Wwe realy appreiciate your comment